이전 시간에 게시판을 조회하고 새 글을 추가하는것 까지 하였다.
이번에는 게시판의 글의 제목이 아니라 내용을 보고 그 내용을 수정하는 과정을 해보자.
글 상세보기
이 기능은 글 목록에서 글 제목을 클릭하면 새로운 창을 뛰어 글의 내용을 보여준다.
1) 글 제목을 클릭하여 /viewArticle.do?articleNP={글번호} 로 요청한다.
2) 컨트롤러는 전송된 글 정보를 조회하여 상세창을 포워딩한다.
3) 상세창을 통해 글 정보와 이미지 파일을 표시한다.
첨부 이미지를 위해 새로운 패키지를 만들어 클래스를 생성한다. 코드는 아래와 같다.
FileDownloadController.java
|
1
2
3
4
5
6
7
8
9
10
11
12
13
14
15
16
17
18
19
20
21
22
23
24
25
26
27
28
29
30
31
32
33
34
35
36
37
38
39
40
41
42
43
44
45
46
47
48
49
50
51
52
53
54
55
56
57
58
59
60
61
62
63
64
65
66
|
package sec03.common;
import java.io.File;
import java.io.FileInputStream;
import java.io.IOException;
import java.io.OutputStream;
import java.io.IOException;
import javax.servlet.ServletConfig;
import javax.servlet.ServletException;
import javax.servlet.annotation.WebServlet;
/**
* Servlet implementation class FileDownloadControll
*/
@WebServlet("/download.do")
public class FileDownloadController extends HttpServlet {
private static String ARTICLE_IMAGE_REPO = "C:\\board\\image";
/**
* @see HttpServlet#doGet(HttpServletRequest request, HttpServletResponse
* response)
*/
protected void doGet(HttpServletRequest request, HttpServletResponse response) throws ServletException, IOException {
doHandle(request, response);
}
/**
* @see HttpServlet#doPost(HttpServletRequest request, HttpServletResponse
* response)
*/
protected void doPost(HttpServletRequest request, HttpServletResponse response) throws ServletException, IOException {
doHandle(request, response);
}
protected void doHandle(HttpServletRequest request, HttpServletResponse response) throws ServletException, IOException{
request.setCharacterEncoding("utf-8");
response.setContentType("text/html; charset=utf-8");
String imageFileName = (String) request.getParameter("imageFileName");
String articleVO = request.getParameter("articleNO");
//이미지 파일 이름과 글 번호를 가져옴
System.out.println("ImageFileName....: " + imageFileName);
OutputStream out = response.getOutputStream();
String path = ARTICLE_IMAGE_REPO + "\\" + articleVO + "\\" + imageFileName; //글 번호에 대한 파일 경로 설정
File imageFile = new File(path);
response.setHeader("Cache-Control", "no-cache");
response.addHeader("Content-disposition", "attachment;fileName=" + imageFileName);
//이미지 파일을 내려받는데 필요한 response에 헤더 정보를 설정
FileInputStream in = new FileInputStream(imageFile);
byte[] buffer = new byte[1024*8];
while(true) {
int count = in.read(buffer);
if(count == -1) break;
out.write(buffer,0,count);
}
in.close();
out.close();
//버퍼를 이용해 한번에 8Kb씩 전송
}
}
http://colorscripter.com/info#e" target="_blank" style="color:#e5e5e5text-decoration:none">Colored by Color Scripter
|
주석으로 간단하게 내용을 표시하였다. viewArticle.jsp에서 전송한 글 번호와 이미지 파일 이름으로 파일경로를 만든 후 해당 파일을 내려받는다.
이제 Controller클래스에 다음의 글번호를 받는 부분을 만든다.
|
1
2
3
4
5
6
7
8
9
|
//......
String articleNO = request.getParameter("articleNO"); // 요청할 경우 articleVO값을 가져옴
articleVO = boardService.viewArticle(Integer.parseInt(articleNO));
request.setAttribute("article", articleVO); //articleNO에 대한 글 정보를 조회하고 article속성으로 바인딩
nextPage = "/board04/viewArticle.jsp";
}
//...
http://colorscripter.com/info#e" target="_blank" style="color:#e5e5e5text-decoration:none">Colored by Color Scripter
|
코드를 보면 글 번호에 해당하는 글 정보를 가져와 article 속성으로 바인딩한다.
Controller 클래스를 추가하면 이제 Service 클래스에 위의 코드에 있는 함수를 만들어주자.
|
1
2
3
4
5
6
7
|
//......
public ArticleVO viewArticle(int articleVO) {
ArticleVO article = null;
article = boardDAO.selectArticle(articleVO);
return article;
}
//....
http://colorscripter.com/info#e" target="_blank" style="color:#e5e5e5text-decoration:none">Colored by Color Scripter
|
이 메서드는 컨트롤러에서 전달받은 글번호로 DAO클래스의 selectArticle() 메서드를 호출한다.
그렇다면 이제 DAO클래스에 해당 메서드를 만들어 DB와 연동하도록 하자.
|
1
2
3
4
5
6
7
8
9
10
11
12
13
14
15
16
17
18
19
20
21
22
23
24
25
26
27
28
29
30
31
32
33
34
35
36
37
38
|
//....
public ArticleVO selectArticle(int articleNO) {
ArticleVO article = new ArticleVO();
try {
con = dataFactory.getConnection();
String query ="select articleNO,parentNO,title,content, imageFileName,id,writeDate"
+" from t_board"
+" where articleNO=?";
System.out.println(query);
pstmt = con.prepareStatement(query);
pstmt.setInt(1, articleNO);
ResultSet rs = pstmt.executeQuery();
String title = rs.getString("title");
String content = rs.getString("content");
String imageFileName = rs.getString("imageFileName");
String id = rs.getString("id");
Date writeDate = rs.getDate("writeDate");
article.setArticleNO(_articleNO);
article.setParentNO(parentNO);
article.setTitle(title);
article.setContent(content);
article.setImageFileName(imageFileName);
article.setWriteDate(writeDate);
}catch(Exception e) {
e.printStackTrace();
}
return article;
}
//....
http://colorscripter.com/info#e" target="_blank" style="color:#e5e5e5text-decoration:none">Colored by Color Scripter
|
전달받은 글 번호를 이용해 글 정보를 조회한다. 이렇게 클래스를 모두 구성하고 JSP인 viewArticle.jsp를 작성한다.
|
1
2
3
4
5
6
7
8
9
10
11
12
13
14
15
16
17
18
19
20
21
22
23
24
25
26
27
28
29
30
31
32
33
34
35
36
37
38
39
40
41
42
43
44
45
46
47
48
49
50
51
52
53
54
55
56
57
58
59
60
61
62
63
64
65
66
67
68
69
70
71
72
73
74
75
76
77
78
79
80
81
82
83
84
85
86
87
88
89
90
91
92
93
94
95
96
97
98
99
100
101
102
103
104
105
106
107
108
109
110
111
112
113
114
115
116
117
118
119
120
121
122
123
124
125
126
127
128
129
130
131
132
133
134
135
136
137
138
139
140
141
142
143
144
|
<%@ page language="java" contentType="text/html; charset=UTF-8"
pageEncoding="UTF-8"
isELIgnored="false" %>
<%
request.setCharacterEncoding("UTF-8");
%>
<c:set var="contextPath" value="${pageContext.request.contextPath}" />
<head>
<meta charset="UTF-8">
<title>글보기</title>
<style>
#tr_btn_modify{
display:none;
}
</style>
<script type="text/javascript" >
function backToList(obj){
}
function fn_enable(obj){
document.getElementById("i_title").disabled=false;
document.getElementById("i_content").disabled=false;
document.getElementById("i_imageFileName").disabled=false;
document.getElementById("tr_btn_modify").style.display="block";
document.getElementById("tr_btn").style.display="none";
}
function fn_modify_article(obj){
}
function fn_remove_article(url,articleNO){
var form = document.createElement("form");
form.setAttribute("method", "post");
form.setAttribute("action", url);
var articleNOInput = document.createElement("input");
articleNOInput.setAttribute("type","hidden");
articleNOInput.setAttribute("name","articleNO");
articleNOInput.setAttribute("value", articleNO);
form.appendChild(articleNOInput);
document.body.appendChild(form);
}
function readURL(input) {
var reader = new FileReader();
reader.onload = function (e) {
}
reader.readAsDataURL(input.files[0]);
}
}
</script>
</head>
<body>
<form name="frmArticle" method="post" action="${contextPath}" enctype="multipart/form-data">
<table border="0" align="center">
<tr>
<td width="150" align="center" bgcolor="#FF9933">
글번호
</td>
<td >
<input type="text" value="${article.articleNO }" disabled />
<input type="hidden" name="articleNO" value="${article.articleNO}" />
</td>
</tr>
<tr>
<td width="150" align="center" bgcolor="#FF9933">
작성자 아이디
</td>
<td >
</td>
</tr>
<tr>
<td width="150" align="center" bgcolor="#FF9933">
제목
</td>
<td>
</td>
</tr>
<tr>
<td width="150" align="center" bgcolor="#FF9933">
내용
</td>
<td>
<textarea rows="20" cols="60" name="content" id="i_content" disabled />${article.content }</textarea>
</td>
</tr>
<c:if test="${not empty article.imageFileName && article.imageFileName!='null' }">
<tr>
<td width="150" align="center" bgcolor="#FF9933" rowspan="2">
이미지
</td>
<td>
<input type= "hidden" name="originalFileName" value="${article.imageFileName }" />
<img src="${contextPath}/download.do?articleNO=${article.articleNO}&imageFileName=${article.imageFileName}" id="preview" /><br>
</td>
</tr>
<tr>
<td>
<input type="file" name="imageFileName " id="i_imageFileName" disabled onchange="readURL(this);" />
</td>
</tr>
</c:if>
<tr>
<td width=20% align=center bgcolor=#FF9933>
등록일자
</td>
<td>
<input type=text value="<fmt:formatDate value="${article.writeDate}" />" disabled />
</td>
</tr>
<tr id="tr_btn_modify" >
<td colspan="2" align="center" >
<input type=button value="수정반영하기" onClick="fn_modify_article(frmArticle)" >
<input type=button value="취소" onClick="backToList(frmArticle)">
</td>
</tr>
<tr id="tr_btn" >
<td colspan=2 align=center>
<input type=button value="삭제하기" onClick="fn_remove_article('${contextPath}/board/removeArticle.do', ${article.articleNO})">
<input type=button value="답글쓰기" onClick="fn_reply_form('${contextPath}/board/replyForm.do', ${article.articleNO})">
</td>
</tr>
</table>
</form>
</body>
</html>
http://colorscripter.com/info#e" target="_blank" style="color:#e5e5e5text-decoration:none">Colored by Color Scripter
|
JSP에 대한 설명은 넘어간다. 이렇게 작성하고 /board/listArticle.do로 요청하여 글 목록창을 조회하고 아무 타이틀을 클릭하여 글 내용에 대한 상세정보를 확인할 수 있다.
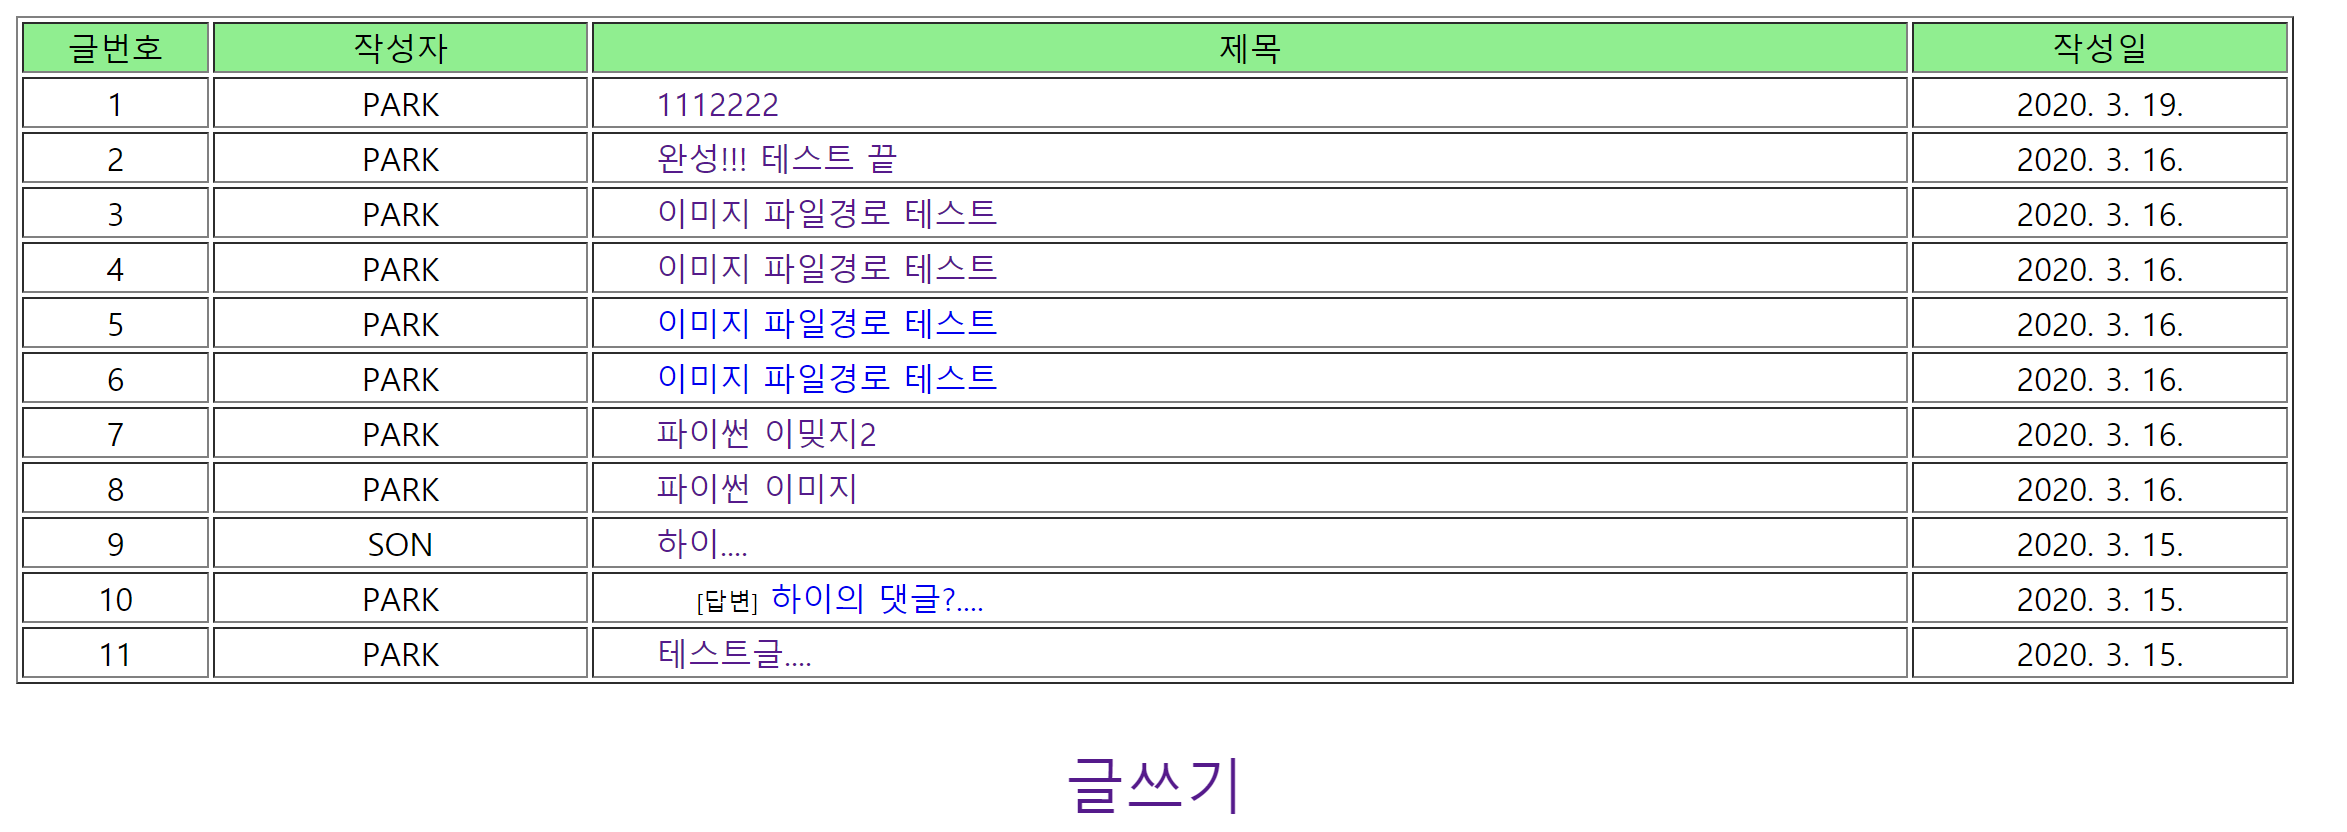
여기서 글 번호 3번의 제목을 눌러 내용을 보자
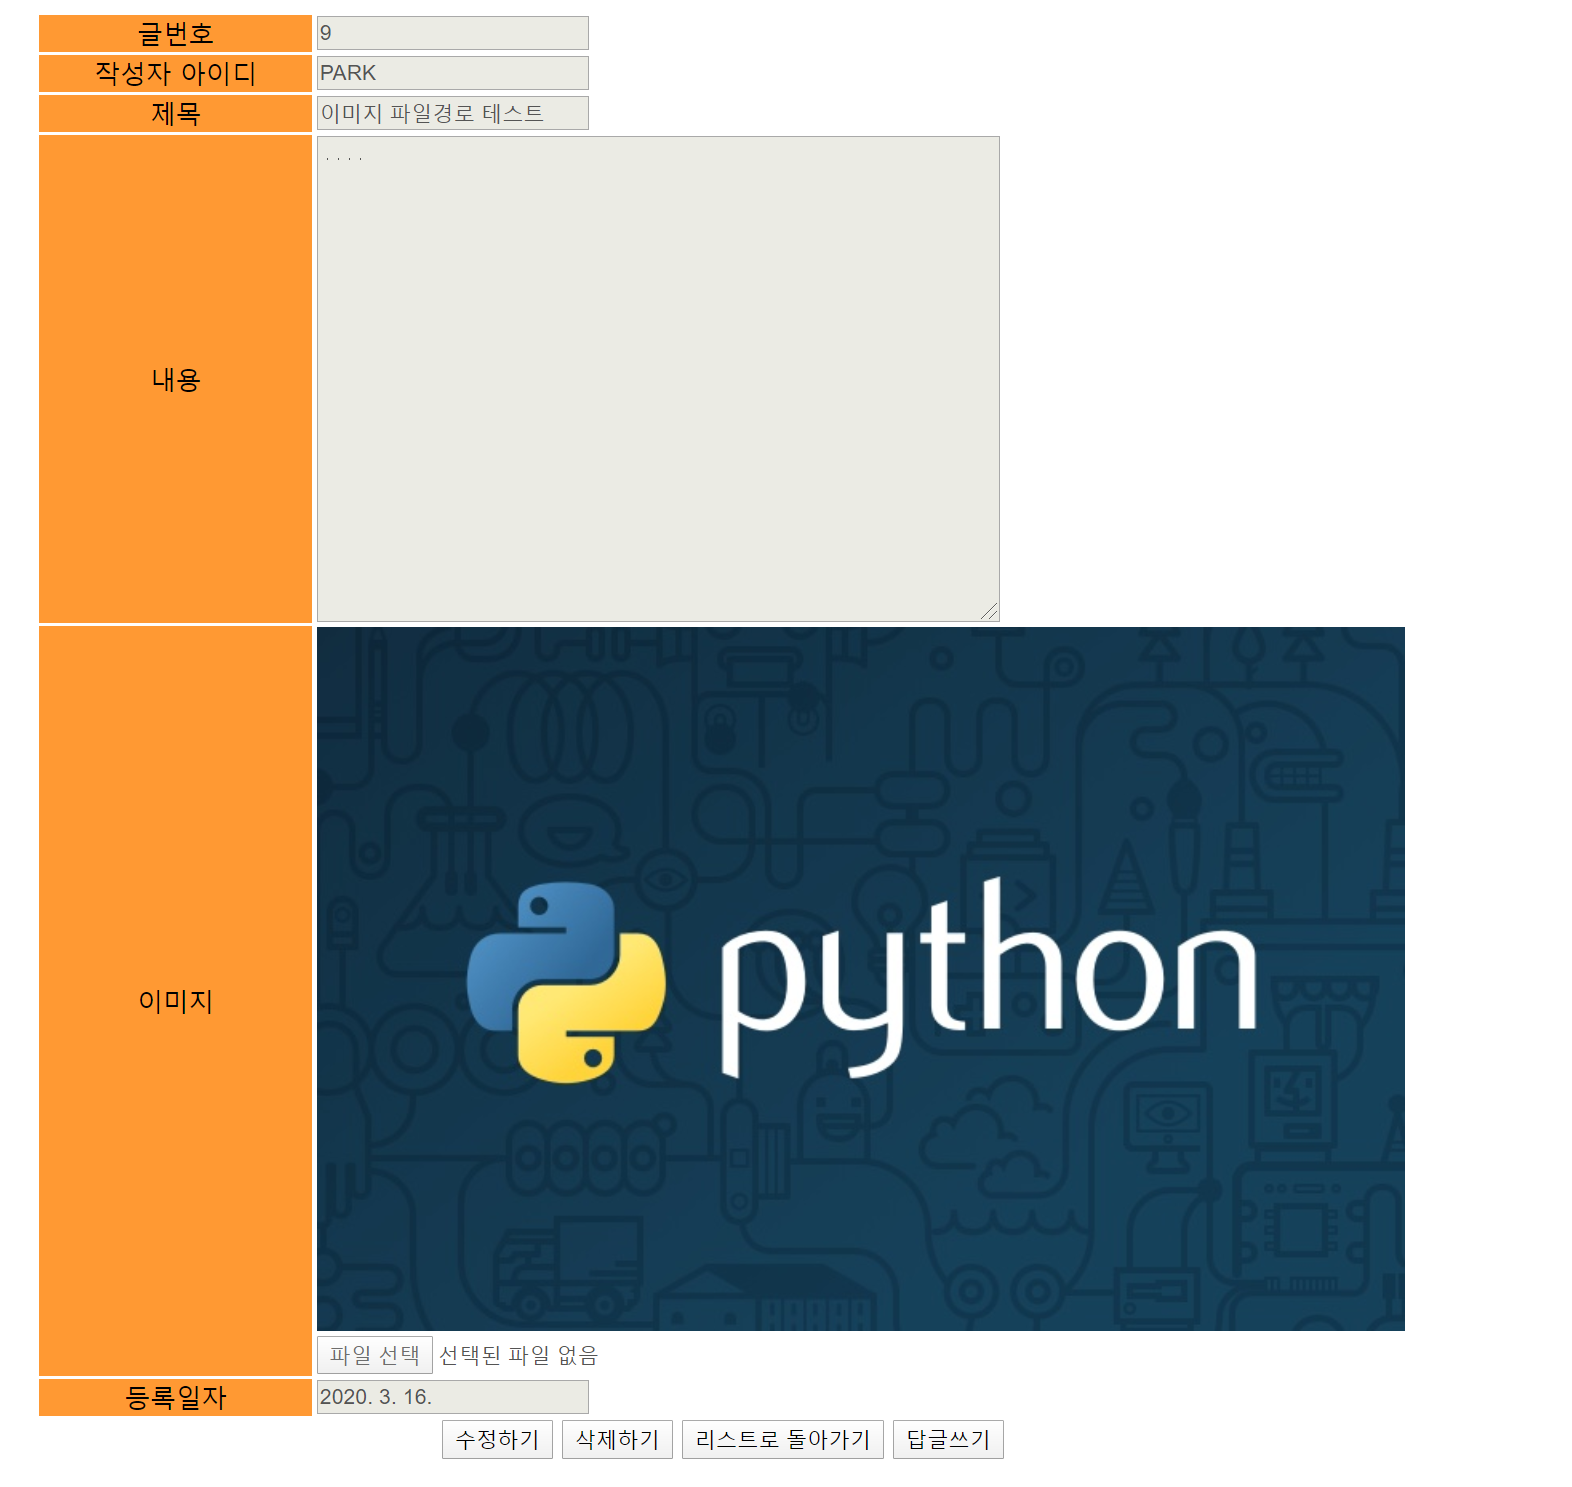
글 내용을 위와 같이 볼 수 있다.
글 수정하기
내용 수정은 위 그림에서 수정하기를 누르면 각 입력창들을 활성화시킨다.
1) 정보와 이미지를 수정한 후 완료를 클릭해 /board/modAricle.do 로 요청한다.
2) 컨트롤러는 요청에 대해 upload() 함수를 이용해 수정된 데이터를 Map에 저장하고 반환한다.
3) 컨트롤러는 수정된 데이터를 테이블에 반영한 후 tep폴더에 업로드된 수정 이미지를 글 번호 폴더로 이동한다.
4) 글 번호 폴더에 있던 원래 이미지 파일을 삭제한다.
먼저 Controller 클래스를 수정한다. 수정 요청이 오면 upload() 메서드로 수정 데이터를 Map으로 가져온다.
1) Map의 데이터를 다시 ArticleVO 객체의 속성에 저장한 후
2) SQL문으로 전달하여 수정 데이터를 반영한다.
3) 마지막으로 tep폴더에 업로드된 수정 이미지를 다시 글 번호 폴더로 이동하고 글 번호 폴더의 원래 이미지를 삭제한다.
|
1
2
3
4
5
6
7
8
9
10
11
12
13
14
15
16
17
18
19
20
21
22
23
24
25
26
27
28
29
30
31
32
33
|
//.........
Map<String, String> articleMap = upload(request, response);
articleVO.setArticleNO(articleNO);
articleVO.setParentNO(0);
articleVO.setId("PARK");
articleVO.setTitle(title);
articleVO.setContent(content);
articleVO.setImageFileName(imageFileName);
boardService.modArticle(articleVO);
if (imageFileName != null && imageFileName.length() != 0) {
File srcFile = new File(ARTICLE_IMAGE_REPO + "\\" + "tep" + "\\" + imageFileName);
File destDir = new File(ARTICLE_IMAGE_REPO + "\\" + articleNO);
FileUtils.moveFileToDirectory(srcFile, destDir, true);
//수정된 이미지 파일을 폴더로 이동
File oldFile = new File(ARTICLE_IMAGE_REPO + "\\" + articleNO + "\\" + originalFileName);
oldFile.delete(); //전송된 originalimageFileName을 이용해 기존의 파일을 삭제
}
PrintWriter pw = response.getWriter();
return;
}
RequestDispatcher dispatch = request.getRequestDispatcher(nextPage);
dispatch.forward(request, response);
//.....
http://colorscripter.com/info#e" target="_blank" style="color:#e5e5e5text-decoration:none">Colored by Color Scripter
|
위에서 말한 순서와 같다. ArticleVO 객체의 속성에 저장하고 Service 클래스의 modArticle() 메서드를 호출한다. Service클래스를 아래와 같이 추가한다.
|
1
2
3
|
public void modArticle(ArticleVO article) {
boardDAO.updateArticle(article);
}
http://colorscripter.com/info#e" target="_blank" style="color:#e5e5e5text-decoration:none">Colored by Color Scripter
|
코드를 보면 이 메서드는 DAO의 메서드를 호출한다. 수정 데이터를 전달하는데 DAO클래스에 updateArticle() 메서드를 추가하자.
|
1
2
3
4
5
6
7
8
9
10
11
12
13
14
15
16
17
18
19
20
21
22
23
24
25
26
27
28
29
30
31
32
|
///....
public void updateArticle(ArticleVO article) {
int articleNO = article.getArticleNO();
String title = article.getTitle();
String content = article.getContent();
String imageFileName = article.getImageFileName();
try {
con = dataFactory.getConnection();
String query = "update t_board set title=?,content=?";
if (imageFileName != null && imageFileName.length() != 0) {
query += ",imageFileName=?";
} // 수정된 이미지 파일이 있을때만 수정
query += " where articleNO=?";
System.out.println(query);
pstmt = con.prepareStatement(query);
pstmt.setString(1, title);
pstmt.setString(2, content);
if (imageFileName != null && imageFileName.length() != 0) {
pstmt.setString(3, imageFileName);
pstmt.setInt(4, articleNO);
} else {
pstmt.setInt(3, articleNO);
} // 이미지 파일을 수정하는 경우와 그렇지 않을 경우 따로 설정
pstmt.executeUpdate();
} catch (Exception e) {
e.printStackTrace();
}
}
//
http://colorscripter.com/info#e" target="_blank" style="color:#e5e5e5text-decoration:none">Colored by Color Scripter
|
전달된 수정 데이터에 대해 이미지파일을 수정하는 경우와 이미지 파일을 수정하지 않는 경우를 구분해 SQL문을 생성하여 수정 데이터를 반영한다.
이제 viewArticle.jsp 파일을 수정한다.
|
1
2
3
4
5
6
7
8
9
10
11
12
13
14
15
16
17
18
19
20
21
22
23
24
25
26
27
28
29
30
31
32
33
34
35
36
37
38
39
40
41
42
43
44
45
46
47
48
49
50
51
52
53
54
55
56
57
58
59
60
61
62
63
64
65
66
67
68
69
70
71
72
73
74
75
76
77
78
79
80
81
82
83
84
85
86
87
88
89
90
91
92
93
94
95
96
97
98
99
100
101
102
103
104
105
106
107
108
109
110
111
112
113
114
115
116
117
118
119
120
121
122
123
124
125
126
127
128
129
130
131
132
133
134
135
136
137
138
139
140
141
142
143
144
|
<%@ page language="java" contentType="text/html; charset=UTF-8"
pageEncoding="UTF-8"
isELIgnored="false" %>
<%
request.setCharacterEncoding("UTF-8");
%>
<c:set var="contextPath" value="${pageContext.request.contextPath}" />
<head>
<meta charset="UTF-8">
<title>글보기</title>
<style>
#tr_btn_modify{
display:none;
}
</style>
<script type="text/javascript" >
function backToList(obj){
}
function fn_enable(obj){
document.getElementById("i_title").disabled=false;
document.getElementById("i_content").disabled=false;
document.getElementById("i_imageFileName").disabled=false;
document.getElementById("tr_btn_modify").style.display="block";
document.getElementById("tr_btn").style.display="none";
}
function fn_modify_article(obj){
}
function fn_remove_article(url,articleNO){
var form = document.createElement("form");
form.setAttribute("method", "post");
form.setAttribute("action", url);
var articleNOInput = document.createElement("input");
articleNOInput.setAttribute("type","hidden");
articleNOInput.setAttribute("name","articleNO");
articleNOInput.setAttribute("value", articleNO);
form.appendChild(articleNOInput);
document.body.appendChild(form);
}
function readURL(input) {
var reader = new FileReader();
reader.onload = function (e) {
}
reader.readAsDataURL(input.files[0]);
}
}
</script>
</head>
<body>
<form name="frmArticle" method="post" action="${contextPath}" enctype="multipart/form-data">
<table border="0" align="center">
<tr>
<td width="150" align="center" bgcolor="#FF9933">
글번호
</td>
<td >
<input type="text" value="${article.articleNO }" disabled />
<input type="hidden" name="articleNO" value="${article.articleNO}" />
</td>
</tr>
<tr>
<td width="150" align="center" bgcolor="#FF9933">
작성자 아이디
</td>
<td >
</td>
</tr>
<tr>
<td width="150" align="center" bgcolor="#FF9933">
제목
</td>
<td>
</td>
</tr>
<tr>
<td width="150" align="center" bgcolor="#FF9933">
내용
</td>
<td>
<textarea rows="20" cols="60" name="content" id="i_content" disabled />${article.content }</textarea>
</td>
</tr>
<c:if test="${not empty article.imageFileName && article.imageFileName!='null' }">
<tr>
<td width="150" align="center" bgcolor="#FF9933" rowspan="2">
이미지
</td>
<td>
<input type= "hidden" name="originalFileName" value="${article.imageFileName }" />
<img src="${contextPath}/download.do?articleNO=${article.articleNO}&imageFileName=${article.imageFileName}" id="preview" /><br>
</td>
</tr>
<tr>
<td>
<input type="file" name="imageFileName " id="i_imageFileName" disabled onchange="readURL(this);" />
</td>
</tr>
</c:if>
<tr>
<td width=20% align=center bgcolor=#FF9933>
등록일자
</td>
<td>
<input type=text value="<fmt:formatDate value="${article.writeDate}" />" disabled />
</td>
</tr>
<tr id="tr_btn_modify" >
<td colspan="2" align="center" >
<input type=button value="수정반영하기" onClick="fn_modify_article(frmArticle)" >
<input type=button value="취소" onClick="backToList(frmArticle)">
</td>
</tr>
<tr id="tr_btn" >
<td colspan=2 align=center>
<input type=button value="삭제하기" onClick="fn_remove_article('${contextPath}/board/removeArticle.do', ${article.articleNO})">
<input type=button value="답글쓰기" onClick="fn_reply_form('${contextPath}/board/replyForm.do', ${article.articleNO})">
</td>
</tr>
</table>
</form>
</body>
</html>
http://colorscripter.com/info#e" target="_blank" style="color:#e5e5e5text-decoration:none">Colored by Color Scripter
|
이제 위의 글 상세보기 창에서 '수정하기' 버튼으로 입력창들을 활성화 시킨다.
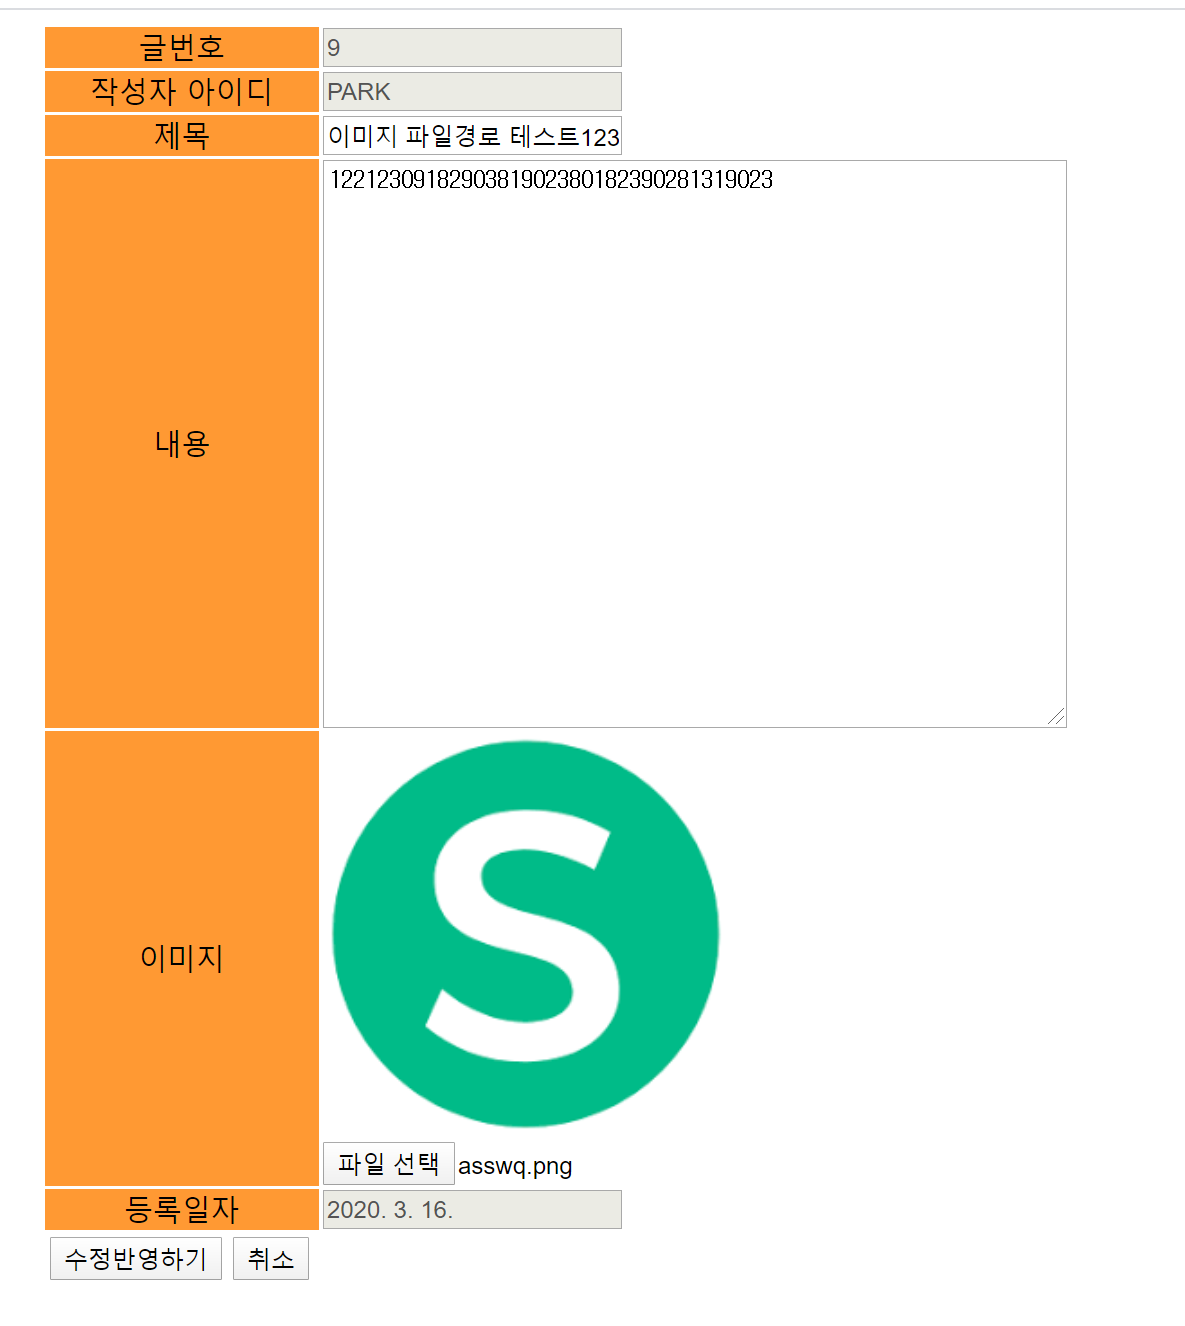
그리고 수정 반영하기를 누르면 수정이 완료됐다는 알림과 함께 입력창이 비활성화 된것을 확인할 수 있을것이다.
'Servlet JSP MVC Spring' 카테고리의 다른 글
| [Spring] Spring framework_ 설치 및 개요_ 의존성주입(DI) (0) | 2020.04.12 |
|---|---|
| [MVC] 게시판 구현하기: 삭제기능, 답글기능 (0) | 2020.03.31 |
| [MVC] 게시판 구현하기_조회, 글 추가 (0) | 2020.03.16 |
| [MVC] 정보 수정 및 삭제 (0) | 2020.03.05 |
| [Servlet] 포워드(dispatch), 바인딩 (0) | 2020.03.03 |